Difference between revisions of "SX-70 Film Door"
From Instant Repair Wiki
m (Titled appropriately) |
(→Film Door Removal: actually fixed image widths) |
||
| (One intermediate revision by the same user not shown) | |||
| Line 1: | Line 1: | ||
[[Category:SX-70 Repair]] | [[Category:SX-70 Repair]] | ||
Main page: [[SX-70 | Main page: [[SX-70 Repair]] | ||
== Film Door Removal == | == Film Door Removal == | ||
| Line 11: | Line 11: | ||
[[File:Latch_release_(highlighted).png|border|center]] | [[File:Latch_release_(highlighted).png|border|center|500px]] | ||
| Line 19: | Line 19: | ||
[[File:Door_Latch_(Edited).png|border|center]] | [[File:Door_Latch_(Edited).png|border|center|500px]] | ||
| Line 27: | Line 27: | ||
[[File:Film_Door_Removal_(highlighted).png|border|center]] | [[File:Film_Door_Removal_(highlighted).png|border|center|500px]] | ||
| Line 35: | Line 35: | ||
[[File:Film_Door_Removal_Last_Stage_(highlighted).png|border|center]] | [[File:Film_Door_Removal_Last_Stage_(highlighted).png|border|center|500px]] | ||
Follow the steps in reverse order to reattach the film door. | Follow the steps in reverse order to reattach the film door. | ||
Latest revision as of 05:06, 3 February 2021
Main page: SX-70 Repair
Film Door Removal
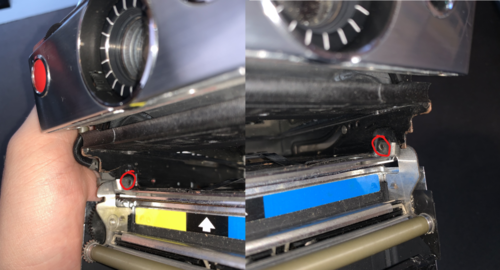
The film door attaches to the main body via two arms that hinge on two pins.
1. To remove the film door it must first be opened by pressing down on the latch at the side of the camera, just as if you were going to load some film.
This will now make visible the two pins that the film door is hinging on.
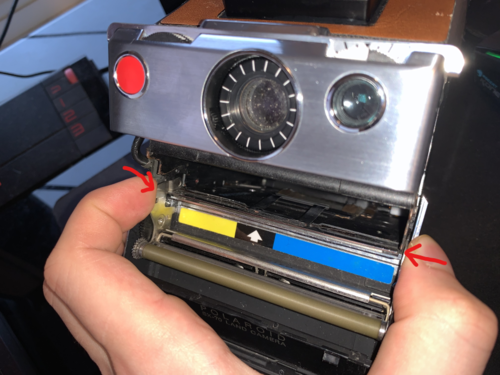
2. Apply pressure to both arms with your finger and thumb, aiming to unhook the side that that latch is on first.
3. After one side has came loose, the other can be wiggled out.
Follow the steps in reverse order to reattach the film door.


